Art of Making
Gum Trees
| The Art of Making Gum Trees |
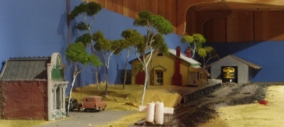
The past twelve months have allowed me to resume my model railway project. Previously I have never completed the scenery on a layout before either deciding the layout wasn’t right and starting again or moving house. Having bought a house I am confident I will be able to complete the layout however, just in case I decided I would build the layout in stages completing each stage as fully as possible before moving on to the next stage. This brought me to the challenge of scenery which I have not had to face since I was a young child. While ballasting, base board coverage and buildings seem to have a ready supply of solutions for the Australian modeler these days, I was unable to find any reasonably priced gum trees. I turned to the pages of AMRM which I have been collecting over many years on and off and found several articles describing various methods of making trees. One article discussed the number of trees required to make a realistic scene. I quickly realised I was going to need a lot of trees and a way to make them quickly. Out of this need I developed the following method and choose to share this with you. Components Tools Method Wire Preparation Cut 10 lengths of 10cm and 10 lengths of 15cm without removing the shielding. Strip a 1cm section of the shield from each short length by rolling the cable on a flat hard surface with a sharp hobby knife. Repeat this for each length. [Photo – Wire being cut with 3 core in back ground and soldered wire in foreground] Coat the exposed end of the wire with solder. Before the wire cools grasp the soldered end with pliers and use the second pliers to pull back the remaining shielding. Doing this while the wire is hot makes it easier to remove the shield. Otherwise simply run the knife down the length of the wire and strip back the shield. I prefer the first method as I’ve had less cuts from it. Give the wire a small twist about two thirds up the length of the wire and then solder the wire at this point. Once completed you should have twenty lengths of wire with solders ends. Shaping the Tree My first tree took fifteen minutes to share, then I continued to play with it until I was truly happy with the outcome. After that I was able to get the shaping process down to two minutes per tree at the worst case. Making the Goo Being rather impatient and not wanting the expense of the paint I asked if there was a suitable substitute. The sales person pointed out that Selleys no more gaps is water based and could be thinned and may suit my purpose. Find a container which will allow you enough depth to dip your tree, I use a V05 hair gel container (mega hold). Fill the bottom third of the container with no more gaps, add water and stir until you have a mixture which flows slowly about the consistency of a cake mix. It may take a while to mix the selleys with the water and I advise adding small amounts of water to the mix until you get the desired consistency. Making the Tree Colouring the Trunk Then simply drag the length of the trunk through the mix to form light and dark patterns on the trunk. Adding the Foliage Variations |